3.1.2. Edit Menu
The edit menu generally provides commands for operating on the selected vertices, edges, and faces. A selected vertex is indicated in red (or in the anaglyph view, with a lighter shade); unselected points are indicated in black. An edge is selected if both of its endpoints are selected; a face is selected if all three vertices are selected.Undo (^Z): undoes the most recent command. This command may be repeated, undoing your work up to the last time the document was saved.
Redo: redoes the most recently undone command. This command may be repeated until there are no more commands to redo.
Cut (^X), Copy (^C), Paste (^V), Clear: these are the Mac standard editing operations. In the main document window, these operate on the currently selected vertices, edges, and faces. The clipboard format is internal to Meshwork and not meaningful to other applications. Note that pressing the delete or del key on the keyboard is equivalent to using Clear. In the Material Properties dialog, these editing functions operate on the material texture. You can also Paste a picture into the main document window; this will appear as the background of the document. This is an extremely useful way to trace out an existing model or image, and convert it into a 3D model.
Select All (^A): selects all vertices (and therefore, all edges and faces) which are not hidden (see Hide Selected).
Select None (^D): deselects all vertices, edges, and faces.
Select Connected: selects all vertices connected, directly or indirectly, to vertices which are already selected. For example, if you've created a sphere and a cylinder in the same place and in the same material, it may be difficult to select just one of them to move it elsewhere. Simply click on any vertex of the sphere, and use this command to select the rest of it.
Duplicate: duplicates the selected vertices, edges, and faces, moving them one step down and to the right of the originals. This is basically equivalent to doing a Copy and Paste, then pressing down-arrow, right-arrow (see keyboard controls).
Relax (^R):
Tense (^T): shifts the selected vertex away from the average position of all points to which it is attached. If the edges were rubber bands, this operation would tend to increase the tension of the system.
Find Overlaps...: This command prompts you for a distance, then selects all vertices which are within that distance of any other vertex. The idea here is to find all overlapping vertices. You can simply do this for your own information, or you can follow it with the next command.
Combine Overlaps: Use this command to combine any selected overlapping vertices. "Overlapping" here means within the distance specified in the last "Find Overlaps" command. Each overlapping pair of vertices is replaced with a single vertex, to which all edges are appropriately attached. This command is used to fuse together two objects which may have been modeled separately, for example, the left and right halves of a model, or a torso and limb.
Find Strays: This command selects any vertices which are not attached to some triangle. (They may be attached to edges, as long as those edges don't form a triangle.) Such vertices are "stray" in the sense that they generally won't contribute to the final rendering.
Set Bone... (^B): sets the bone code or codes for the selected vertices. Bones are a way of assigning vertices (and their attached edges and faces) to units which can be positioned and rotated relative to one another, like joints and limbs of a marionnette.
Every bone in Meshwork is specified by a 4-character code. You can enter one or two bones into the Set Bone dialog (shown at right). To attach the selected part of the model to a single bone, enter the bone code in the field on the left, and make sure the slider is set all the way to the left. To attach to two bones, first enter bone codes in both fields. Then set the slider to reflect the relative strength of attachment between the two bones.
For more information on bones, see Section 2.3: Using Bones.
Face Front (^F): Every face in the model has a front side and a back side; you can tell the difference in Meshwork because the faces are not drawn (colored or shaded) when the back side is facing you. The Face Front command forces all selected faces to face you -- i.e., to have the front side towards the camera, whatever its current position).
Face Out: forces every selected face to turn its back side towards the center of the selected set, and its front side away from the center. This is especially useful when you've an imported model has several faces facing the wrong way; this command can often fix the whole model at once.
Invert Face: this flips all selected faces; the front side becomes the back, and vice versa.
Flip Horizontal: this flips the selected vertices, edges, and faces horizontally about the selection center -- the leftmost point is now on the right, etc.
Flip Vertically: this flips the selected vertices, edges, and faces vertically about the selection center -- the topmost point is now on bottom, etc.
Scale...: grows or shrinks the selected part of the model, either relative to the center of the selection, or relative to the axes origin. The Scale dialog is shown at right. The selected edges and faces can be scaled separately in the X, Y, and Z dimensions, so to get uniform scaling, enter the same percentage in all three fields.
Rotate...: rotates the selected part of the model, either around to the center of the selection, or around the axes origin. Meshwork uses a right-handed coordinate system for rotations -- that is, if you point your right thumb in the direction of the positive axis, your fingers curl in the direction of the rotation about that axis. When you specify multiple rotations, they are done in Y, X, Z order. Simultaneous rotations can be confusing; if in doubt, just rotate about one axis at a time.
Subdivide: this command divides each selected triangle into four smaller triangles.
It is handy when you need to add extra contours to a model, in a more symmetrical way than is possible with the split tool. But it should be used sparingly, as this command increases the complexity (and decreases the efficiency) of your model very quickly.
Note that since Meshwork faces must be triangular, each side of the box actually contains two faces separated by a diagonal. Also, since the "back" face of a box perfectly overlaps the "front" face, it may be difficult to perceive the 3-D shape unless you turn on Orthographic mode. Finally, note that a box may be a good starting point for a more complex shape; for example, you can easily indent or outdent any face of the box by using the Split tool.
Sphere...:
creates an approximation of a sphere. The sphere is approximated by a set of regular polygons, stacked around the Y axis, and connected to form a solid 3D shape. "Diameter" is the width of the sphere. "Lattitude Lines" is how many polygons are stacked to form the sphere, including the poles; these are comparable to the lattitude lines on a globe. You must specify at least 3 lattitude lines (two poles and an equator), but may specify many more. "Longitude Lines" is how many sides each polygon has, roughly comparable to the longitude lines on a globe. If the "Stagger" checkbox is checked, each polygon will be rotated relative to the ones above and below it, resulting in a somewhat smoother appearance (by roughly doubling the number of "facets" used in the shape). An example will illustrate these concepts.
Unlike Create Box, you don't have control of the sphere's aspect ratio at creation time. However, the sphere will be the only object selected, so you may immediately follow its creation with scalings and rotations to create any ovoid shape.
Sphere 2...:
also creates an approximation of a sphere, but it uses a different algorithm. This one works by starting with an octahedron, then subdividing a specified number of times (1 by default). The resulting shape has a very high degree of symmetry, and appears the same from nearly any direction; this differs from the first Sphere algorithm (above) which has distinct poles. The Samples folder contains a file comparing the two types of spheres.
As of version 1.2.2, you can create either open-ended or closed cylinders. If the "Close Ends" checkbox is checked, each end will be capped by adding an extra point to the center of each end.
Cone...:
creates an open-ended approximation of a cone. This is done by creating a regular polygon
around the Y axis, and connecting each ventex to a single point (the cone tip). The dialog
has three fields.
"Diameter" is the width of the base.
"Height" is the distance from the base of the cone to the tip, i.e. the extent of the cylinder along the Y axis. "Sides" is the number of sides in each polygon.
Tip: to create a truncated cone, start with a Cylinder instead, and simply scale down one end.
Extrude...:
Start by selecting a set of points. Usually you'll want these points joined by edges to form a two-dimensional figure like a circle, square, star, etc. Then use the Extrude command. In the dialog box that appears, put in the total length of the figure to create, and the number of steps (sections) to produce along the way. Also choose the axis: usually, you'll want to extrude along an axis perpendicular to the plane of your starting figure.
When you click OK, extrusion happens in two phases. First, the selected points and edges are duplicated steps times, evenly spaced to cover the specified total depth along the chosen axis. Second, every edge in the starting figure is joined by a diagonal to the corresponding edge in the next step of the extrusion -- in other words, each initial edge becomes a surface. The created surfaces face away from the center of the figure.
In the example shown, the initial shape was a triangle, and this was extruded for 100 units in two steps. It's shown in Orthographic mode so that the three-dimensional shape is more apparent.
Lathe...:
Lathe is similar to Extrude in that it begins with a template: a set of selected, usually connected, vertices. Again the starting figure is duplicated and connected to form a series of section in depth. But rather than extending straight along one axis, Lathe forms a shape that arcs around an axis in a circle (or partial circle).
Again, start by forming and selecting a two-dimensional figure. In this example, we used a circle as the starting figure. Then Lathe, choose the number of sections, and the total distance -- expressed this time in degrees counter-clockwise about the chosen axis. The example was lathed for -270 degrees in 12 sections (and again is shown in Orthographic mode).
If you lathe exactly 360 degrees (the default), the ends will be a joined together, forming a solid shape like a torus.
The faces are oriented away from the center of each radial section. So if you are making a torus, Meshwork essentially selects each section of the ring, and does a "face out" operation on that section. This is appropriate when the conceptual center of your object is not on the axis of the lathing. When it is, for example in a vase or table leg, then this behavior is often not appropriate. In that case you'll need to select each cross-section of your lathed figure and do a "face out" operation manually. (I am open to suggestions on a better way to handle this automatically.)
In addition, there is a Blueprint option (command-7). This divides the window into four panes, showing Top, Front, Right, and Front Orthographic views of the model simultaneously. To exit Blueprint mode, press command-7 again to return to the previous camera view, or select one of the other views.
The remaining commands in the Camera menu modify the way the model is drawn.
Camera: Orthographic (^I):
This command switches the drawing to an orthographic view -- more specifically, what is known as a "cavalier projection". A cavalier projection combines the depth-axis with the up-down and left-right axes in such a way that you can see several sides of the object at once, and all lengths and distances on the screen are accurate. In this respect, it is similar to an isometric projection, thus the shortcut command-I.
A cavalier projection can be useful, but also has some disadvantages. Because our visual system expects the oblique sides to be foreshortened, we perceive objects drawn in this way as thicker than they are. There is an alternative known as the "cabinet projection" which corrects for this, though lengths and distances drawn on the screen are no longer veridical. A true isometric projection is probably more useful. This command may change or be supplemented in a future version of Meshwork -- let me know what you think.
The view will work with either red/green or red/blue glasses, but you must have the red filter over your right eye. If you don't already have a pair of such glasses, you can get them for $2 shipping from Deep Vision 3D.
For best results, turn off "Draw Faces" in the Display Menu, and consider turning on Orthographic view. Also, note that our brains expect objects further away to be foreshortened. As a result, you may have a striking perception that the back of a cube (see figure) is larger than the front, when in fact they are drawn exactly the same size. Finally, using anaglyph glasses can cause a bit of odd color-shifting at first as your brain tries to sort out conflicting color information from the two eyes. With a little practice, this effect goes away and working with the glasses on can be quite comfortable.
Center Selection: shifts the axes so that the current selection is centered in the window. It is actually possible, using the Center tool, to shift the axes so far that you cannot see them or the model. If this ever happens, simply Select All, then Center Selection, and your model will once again be in view.
Hide Selected (^H):
hides all the currently selected vertices, edges, and faces. Hidden vertices and edges are drawn in a light blue rather than black, and hidden faces are not drawn at all. The hidden points are deselected, and cannot be selected again until they are unhidden.
Hide Others (^G):
hides all vertices, edges, and faces which are not currently selected.
Show All (^U):
unhides all vertices, edges, and faces. (To remember command-U, think "unhide".)
Draw Edges:
this is a toggle command; selecting it adds or removes the checkmark in the menu, which indicates the current state. When "Draw Edges" is checked, the edges (lines connecting the vertices) are drawn; when unchecked, these lines are not drawn (though they still exist in the model).
Draw Vertices:
When this option is checked, unselected vertices are drawn; when unchecked, they are not drawn. Note that selected vertices are drawn in either case.
Draw Faces:
When this option is checked, any unhidden face is drawn provided its "front" side is towards the camera. The face is shaded according to its color (set in the material properties dialog), and its angle with respect to the light source, which always comes from the quadrant (-X, +Y, +Z). When "Draw Faces" is unchecked, faces are not drawn.
3D Preview (^E):
This command uses presents a three-dimensional rendering of your object using the QuickDraw 3D Viewer. This viewer is the same one used by SimpleText, and the same controls apply for rotating, zooming, and translating your model to view it from any angle. Note that since QD3D is not available on 68K machines, the 3D Preview is unavailable in the 68K version of Meshwork. Also note that the Viewer in QuickDraw 1.5.4 has some limitations (e.g., when you rotate the object, the lights rotate with it), which are fixed in the QD3D 1.6.
You can leave the 3D Preview window open, off to the side or behind your
main document window. It will not automatically be updated when you change your model, but when you hit command-E again, it will update itself very quickly.
Poses... (^M):
The Poses menu command brings up the Poses window, used for defining and editing bone-based model poses. For more information, see section 3.5.
Texture Map...:
The Texture Map menu command brings up the Texture Map window, used for viewing (and sometimes editing) the UV texture coordinates of vertices of the currently selected material. For more information, see section 3.6.
When enabled, any selected vertex may have "mirror" points. While selected points are drawn in red, their mirrors are drawn in purple. Any operation done to a selected point is done, suitably reflected about the axis or axes of symmetry, to the mirrored points.
In the example at right, the +/- X symmetry button was clicked (we're viewing here from the front). Then the symmetrical figure was made by clicking five times with the Connect tool. Finally, two points on the left were selected. Note that their "twin" points on the right are drawn in purple, indicating the connection of symmetry. Now, dragging the selected
points to the left will cause the purple points to move to the right, and vice versa.
Dragging the selected points up or down will cause the mirror points to follow.
Double-click (or option-click) the Grid button to change the grid spacing. You can also choose to have the grid drawn when active (the default setting), or have it invisible. If you have a slower Macintosh and a fine grid, you might want to turn the grid drawing off to improve performance.
These spatial coordinates are editable. When coordinates are shown, click in any of the three panes or press Tab to enter "edit mode", and edit the coordinate shown as you would in any spreadsheet. Press the Return or Enter to accept the new value and update the model. Pressing Tab accepts the entry, and selects the next coordinate field. Press Esc to cancel your entry or exit the coordinate fields.
The second display, containing two fields, shows the <u, v> coordinates of the current selection in the texture map. There is a direct mapping from the 3D spatial coordinates into a location on the 2D texture map; this mapping depends on the parameters set in the Material Properties dialog (see below). The <u, v> coordinates shown are simply the texture-map location of the <x, y, z> coordinates shown to the left, according to the texture map settings of the current material. If the current
material is not texture-mapped, then the <u, v> display will be blank. These
fields are editable only if the current material uses pinned-mode texture mapping.
The material palette can also be used for selecting parts of the model. Command-click a material in the palette, and all faces of that material (along with their edges and vertices) will be selected. The previous selection will be deselected, unless you also hold down the shift key.
To edit the properties of a material, double-click or option-click it in the material palette. The Material Properties dialog box will appear, as in the example shown below.
This dialog contains a number of controls:
<ul>
Over the texture (if any) is drawn a sketch of the faces of this material, as they would be mapped onto the texture. This is extremely useful in seeing when you have the right mapping, and just how your texture will be pasted onto the model. Meshwork also has a very handy feature: if there is no texture image (i.e., the words "no texture" are visible behind the sketch), then the Copy command will copy the sketch itself. This can then be pasted into a drawing or paint program, giving you a properly mapped outline of your model to guide creation of the texture.
You may note that where the texture sketch should touch the right edge -- or, in some cases, the bottom -- the lines instead reach clear across the texture to the left. This is because a texture map, topographically speaking, is a torus; the right side is equivalent to the left side, and the top equivalent to the bottom. However, when Meshwork actually generates the final output, faces which cross one of these borders are split from their neighbors in such a way that this wrapping effect is eliminated.
Pinned-mode texture mapping is somewhat special; it doesn't show a texture sketch, and it's not affected by the axis or scale controls. Rather, when you switch from some other mode to Pinned mode, the previous UV mapping is simply "frozen" onto the model -- the UV of every vertex is initially left as it was. But you can now alter those UV coordinates via the coordinate panes or the Texture Map window.
Under the texture map image are two tabs labelled "Image" and "Alpha". These let you select the two channels of the texture map; the image specifies the color at any point in the map, and the Alpha specifies the opacity. In the Alpha channel, you should paste a grayscale picture, where white means perfectly opaque and black means transparent. Note that the interpretation of the alpha channel is up to your rendering system; QD3D/Quesa expects pre-multiplied alpha, which means that where you want your model to be very transparent, the image must be dark or black (and the alpha must also be black).
Finally, the radio buttons under the texture map indicate the texture mode. Opaque indicates that the texture is solid, not transparent or translucent anywhere. Transparent makes the pure white areas of the texture map transparent. Use Alpha directs Meshwork to use the Alpha channel for a translucent texture, as described above.
The arrow keys move the selected vertices up, down, left, or right, as viewed in the editing window.
The numeric keypad is used to move the vertices in the X, Y, and Z directions, regardless of the current camera view. It helps to keep an eye on the coordinate display while using these.
The shift and control keys modify how much the vertices is moved with each keypress. By default, the arrow keys or keypad shift the selection by 5 pixels (the exact distance to which this corresponds depends on the current zoom). Holding the shift key changes this to moving 20 pixels per keypress. Holding control makes each keypress move the vertices by only one pixel.
The geometry stored in the Meshwork file is always in the neutral pose (see section 3.5). This differs from the various Export files, which use the currently selected pose.
A Meshwork file is of type 'TEXT', creator 'Mesh'. It is just a text file and, apart from the textures (which are stored as PICT resources), it may be edited with any text editor. It consists of the following sections, in the order given.
Each vertex line consists of a variable number fields, separated by tabs:
This is illustrated by a few lines from a Meshwork vertices block: The material line contains six or all of the following fields, separated by tabs:
After the material line appear the triangles of that material, one per line, until the next keyword ("UVS", "MATERIAL", or "END"). Each triangle line consists of three vertex indices, separated by tabs.
If (and only if) the material uses pinned-mode texture mapping, the triangle lines will be followed by the keyword "UVS" and a set of UV lines. Each UV line consists of a vertex index, a U coordinate, and a V coordinate, separated by tabs.
This is illustrated in the following example, which contains several MATERIAL blocks: Click the New button to create a new pose. It will be initialized as a copy of the current pose; this makes it easy to create a series of poses, each slightly different from the last. Click Rename to change the name of the current pose, or Delete to delete it.
Each pose is edited using the bone controls in the scrolling part of the window. Each bone is listed here, with two control widgets which set and indicate the axis of rotation, and amount of rotation of that bone.
The control on the left, a purplish sphere with a line emanating from its center, is used to set the axis of rotation. Click or drag in the sphere to change it; as you do so, the vector coordinates of the axis are shown just below the sphere. The default position, <0,0,1>, means rotation about the Z axis (x=0, y=0, z=1).
The control on the right, a circular dial, is used to set the amount of rotation. Again, click and drag to change the value, which is shown below the dial (in degrees).
While it is possible to reach any conceivable rotation via the axis and angle controls, it is often not obvious how to do so. For this reason, additional rotation controls have been provided at the bottom of the window: the Trackball (with twist ring), and Rotation Dials.
<ul>
The trackball and rotation dials apply to the currently selected bone -- whichever one was last clicked, indicated by a highlighted background (blue in the figure). Unlike the axis and angle widgets, which indicate the absolute rotation of the bone, the trackball and dials apply a rotation relative to the bone's current rotation. This is why they have no indication of absolute position.
You may also use the Cut, Copy, Paste, and Clear editing commands on the currently selected bone.
The easiest way to adjust a pose is to arrange the windows such that your model is visible while you manipulate the bone controls. It may be helpful to turn Anaglyph mode on, and turn off drawing of edges and vertices; or if you have enough screen space, use the Blueprint view to see your model from several angles at once. Then simply tweak the bone controls until the pose looks right.
When the material is set to Pinned mode texture mapping, every vertex has a fixed UV coordinate which stays with it, even if that vertex is moved in space. You can change the UV coordinate associated with a vertex (or group of vertices) in two ways. One way is to use the UV coordinate panes, in the toolbar of the main document window. The other way is to move the selected vertices in the Texture Map window. This is done in the same way as in the document window: either drag them with the mouse, or use the arrow keys (in combination with Shift and Control).
Most of the menu commands in the File, Edit, Camera, and Display menus are still enabled when the Texture Map window is frontmost. So you can change views, save your work, export, and so on without switching back to the document view. You'll probably want to keep your fingers near cmd-E (the 3D Preview command), so that you can update the 3D preview frequently while adjusting the texture coordinates.
3.1.3. Vertex Menu
The Vertex menu provides a couple of commands intended to operate on single vertices (though in fact, they will be applied to all selected vertices).
 shifts the position of the selected vertex towards the average position of all points to which it is attached. This command may be repeated multiple times, causing the vertex to shift ever closer towards this ideal central point. Think of the edges as rubber bands; Relax reduces and equalizes the tension on these bands as much as possible.

3.1.4. Transform Menu
The Transform menu contains commands intended to operate on large parts of the model at once. Use the selection commands and tools to select the part of the model (perhaps all) which you want to transform, then use one of the commands below.

 The direction of rotation about each axis is also indicated in the Rotate dialog, shown at left.
3.1.5. Create Menu
Box...:
creates a box, i.e. a six-sided closed object. In the dialog (not shown), specify the width (extent along the X-axis), height (Y-axis), and depth (Z-axis). The created box will be centered on the origin. It will also be the only thing selected, so you can immediately follow this command with a rotation, translation, etc.


The spheres shown above both contain 5 lattitude lines and 8 longitude lines, as shown in the dialog. The sphere at left had the "Stagger" option checked; note that the vertices in the equator are not directly in line with the vertices at upper and lower lattitudes. As a result, each facet is triangular. In the sphere at right, the Stagger option was unchecked. Each vertex is in line with the ones above and below it. While the facets are still divided into triangles within Meshwork, you may note that the triangles occur in coplanar pairs, forming a number of quadrilaterals (except near the poles). For this reason, it is recommended that Stagger be used for most purposes.
 Cylinder...:
creates an approximate cylinder. This is done by creating two regular polygons around the Y axis, and joining them to form an open 3D shape. The dialog has three fields. "Diameter" is the width of each end polygon.
"Height" is the distance between the cylinder ends, i.e. the extent of the cylinder along the Y axis. "Sides" is the number of sides in each polygon.
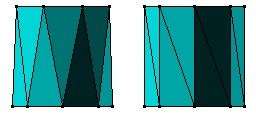
There is also a "Stagger" checkbox, similar to that in the Create Sphere dialog. If it is checked, the top polygon will be rotated relative to the bottom one. The effect is that each facet is a symmetrical triangle, rather than half a quadrilateral. The Stagger option generally produces a smoother-looking cylinder. The cylinders shown at right were both created with the default parameters, but the one at left uses the Stagger option, while the one at right does not. (Note: the back halves of these cylinders have been removed for clarity.)
Cylinder...:
creates an approximate cylinder. This is done by creating two regular polygons around the Y axis, and joining them to form an open 3D shape. The dialog has three fields. "Diameter" is the width of each end polygon.
"Height" is the distance between the cylinder ends, i.e. the extent of the cylinder along the Y axis. "Sides" is the number of sides in each polygon.
There is also a "Stagger" checkbox, similar to that in the Create Sphere dialog. If it is checked, the top polygon will be rotated relative to the bottom one. The effect is that each facet is a symmetrical triangle, rather than half a quadrilateral. The Stagger option generally produces a smoother-looking cylinder. The cylinders shown at right were both created with the default parameters, but the one at left uses the Stagger option, while the one at right does not. (Note: the back halves of these cylinders have been removed for clarity.)
 extends the selected set of points in depth along the X, Y, or Z axis. Think of pressing clay through a mask; the result is a long tube whose cross-sectional shape is the shape of the mask. That's similar to what Extrude does.

3.1.6. Camera Menu
The Camera menu provides ways to adjust your view of the model. The first six options in the menu correspond to the six orthogonal views: front, back, top, bottom, left, and right, in that order. These can be accessed quickly via command-1 through command-6, and it is worth learning these keystrokes so that you can quickly flip from one view to another. The labelling of the axes in the main window will change to reflect your current view.
 Camera: Anaglyph (^Y):
This command switches the drawing to a red/blue anaglyph. An anaglyph is a form of stereogram in which the view for one eye is drawn in one color, and the view for the other eye in a complementary color. By donning appropriate 3D glasses, the viewer may achieve a striking impression of depth; parts of the model appear to be coming right out of the screen, while others sink into it as if through a real window.
Camera: Anaglyph (^Y):
This command switches the drawing to a red/blue anaglyph. An anaglyph is a form of stereogram in which the view for one eye is drawn in one color, and the view for the other eye in a complementary color. By donning appropriate 3D glasses, the viewer may achieve a striking impression of depth; parts of the model appear to be coming right out of the screen, while others sink into it as if through a real window.
3.1.7. Display Menu
The display menu affects both what is drawn, and what can be selected. It provides very important operations for working with complex models, allowing you to ignore certain parts or aspects of the model while you work on one area.
3.2. Toolbar
The Toolbar is the area at the top of the window. It contains a number of
mode tools on the left, followed by three
symmetry buttons, the
grid button, the
coordinate displays, the
material palette, and the
zoom buttons.
3.2.1. Mode Tools
The mode tools determine what happens when you click in the main window. You may only have one mode tool selected at a time. Note that several of the tools (Connect, Split, Disconnect) operate between the previously selected points, and the point clicked. This is a powerful mechanism -- for example, you can connect all points of an outline to a peak with a single click by selecting them, then using the Connect tool. But it is also necessary to use the Deselect All (command-D) command frequently with these tools to avoid unwanted effects.
3.2.2. Symmetry Buttons
3.2.3. Grid Option
3.2.4. Coordinate Displays
In the middle of the tool bar are two sets of coordinates. The first one, containing three fields, shows the <x, y, z> coordinates of the current selection. If a single vertex is selected, this is its location in 3D space. If many vertices are selected, the coordinate shown is their average location, also known as the centroid.
3.2.5. Material Palette
The material palette is used to select the current material (the material used for creating new faces), or to change the material of the currently selected faces. The palette contains eight materials, plus a null material (the leftmost box, with an "x" through it). The null material is used to prevent faces from being created, even when there are three vertices joined by edges. All other materials in the palette are essentially equivalent, but you can specify a variety of options for each one.
3.2.6. Zoom Buttons
The zoom buttons are used to change the scale of your model as it is drawn in the editing window. The first button zooms in (increases the scale), and the second one zooms out (decreases the scale), each by a factor of 2. Note that this does not actually change the scale of your model; vertex coordinates are unaffected.
3.3. Keyboard Controls
In addition to moving selected vertices by dragging with the mouse, vertices can be moved using the keyboard to attain more precise control. The keys active in positioning vertices in the main editing window are highlighted in blue below.
3.4. Meshwork File Format
This section documents the format of Meshwork data files. It is a proprietary format, in the sense that it was created specifically for Meshwork and any changes are controlled by the author. But it is also open and documented. Third-party utilities and converters which operate on Meshwork files are encouraged, and any future changes to the format will be kept backwards compatible as much as possible.
3.4.1. Header
The file begins with the keyword "Mesh", followed by a major and minor version number separated by tabs, e.g.:
Mesh 1 1
The format version number refers to the version of the file format, and may not necessarily correspond to the version of Meshwork which wrote the file. The header, and all subsequent lines, are terminated with the standard Mac line ending ('\r').
3.4.2. Vertices
The next section begins with the keyword "VERTICES" on a line by itself. Following this is a list of vertices, one per line, until some other keyword (usually "EDGES") is encountered.
Fields 5-8 are omitted for normal vertices not attached to bones. Field 8 is included only for bones, rather than normal vertices. Field 6 should be "None" and field 7 should be "100" for bones, but these values are ignored.
VERTICES
0	-45	109	0
1	-24	101	20
2	0	75	29
3	-1	154	34	Chst	None	50
4	0	181	40	Chst	None	100
5	-112	122	-4	LarL	None	100	ArmL
Vertices 0-2 are normal, unboned vertices. Vertices 3 and 4 are attached to bones. Vertex 5 is actually a bone, code "LarL", with parent "ArmL".
3.4.3. Edges
The list of edges in the model begins with the keyword "EDGES" on a line by itself. This is followed by a list of edges, one per line, until the next keyword (usually
"MATERIAL"). Each edge consists of the index number of each endpoint vertex,
separated by tabs, as in this partial example:
EDGES
0	1
0	7
0	12
1	2
1	14
2	3
2	41
3.4.4. Materials
A standard Meshwork file contains eight MATERIAL blocks. Each contains one line describing the material properties, followed by a list of all the triangles of that material.
If the map type is 0 (none), then fields 8-15 are omitted. Note that the actual texture image is stored in the resource fork, in PICT 128 for the first material, 129 for the second, etc. For materials with an alpha channel, the alpha channel image is stored in PICT 1128 for the first material, 1129 for the second, etc.
MATERIAL	0	0	61602	1	0
15	385	20
15	386	385
385	386	90
385	90	95
UVS
15	0.143	1
20	0	0
90	0.98	0.525
95	0.5	0.9
385	1	0.633
386	0	0.1
MATERIAL	0	0	21626	1	0
393	396	392
388	391	387
396	397	392
389	387	391
394	397	396
389	391	390
395	394	396
MATERIAL	65535	0	65535	0	0
MATERIAL	65535	65535	0	0	0
Note that some materials may have no triangles at all.
3.4.5. End
A Meshwork file is terminated by the keyword "END" in a line by itself.

3.5. The Poses Window
Meshwork supports bone-based posing (which could also be used for keyframe animation) via the Poses window
(shown at right), which allows you to view or edit all the poses defined for the model. At the top is a pop-up menu of poses you have defined. There is one special pose, called Neutral, which is always present; it has every bone in its default position (i.e., no rotation). You cannot change or delete the neutral pose.

3.6. The Texture Map Window
This window is opened via the Texture Map menu command in the Display menu. It has two basic functions:
Whenever you select a different material in the main window, or make any changes (such as editing the geometry or changing the mapping parameters for an automatic-mode texture map), the Texture Map window updates immediately to reflect the changes. Standard usage is to position the Texture Map window beside your main document window, so that you can see both at once.
Meshwork Manual Section 3: Reference
Last modified: 09 May 2003
[Back to Index]