Start with a Model
Start by making a Meshwork model of your object. Meshwork is very easy to learn, and documentation is available, including a tutorial.The model at right, a little penguin character, took about twenty minutes from start to finish. Shown (figure 1) is the Meshwork editor view; there is also a texture map on the torso, not visible here. Use the 3D Preview (command-E) feature of Meshwork to preview your model from various angles as it develops.
Export to POV-Ray
Once the model has been built, use the Export > POV-Ray menu command to write a POV-Ray "include" (.inc) file. This text file contains one "mesh" object for each material in your model. Any texture maps are referred to as "texture0.png", "texture1.png", and so on.In my example, I produced a file called penguin.inc. I then used GraphicConverter to save my texture as penguin-tex0.png, matching the texture name in the include file.
Set up the Animation
Another document, "Meshwork and POV-Ray", explains how to use POV-Ray with Meshwork models in more detail. Here, I'm going to focus on the particular needs of sprite-makers. Usually, you need a set of sprites, representing an object facing various directions. POV-Ray can generate the whole set for you at once; all you have to do is set up an appropriate animation sequence.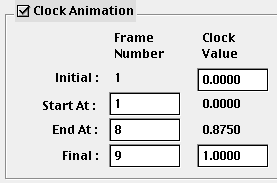 Animation in POV-Ray works by running a "clock" built-in constant from 0 to 1, over some number of frames. You set the animation parameters in the Animation tab of the Render Settings dialog box. For eight frames, you'd set "Start At" to 1 and "End At" to 9 (one plus the number of frames), then "End At" 8, as shown at right. This will make the clock value increment in steps of 1/8 (0.125 at frame 1, 0.250 at frame 2, etc.).
Then, in your POV-Ray scene file, you just use the "clock" constant to calculate the proper rotation. My example scene file does it this way:
object { Penguin scale 0.01 rotate (360*clock)*y translate -0.4*x }
Rotation in POV-Ray is given in degrees, and can happen around any axis. So "rotate (360*clock)*y" means "rotate around the Y axis, by 360 degrees times the clock value". When you start the rendering, POV-Ray will make eight images, with the rotation varying from 0 to 315 degrees.
Render
That's it! Once your animation is set up, just hit command-R to render, and POV-Ray will start generating your sprites. It will save them in any format you prefer (including MacOS PICT), but I've converted them to GIF for display below. Please keep in mind that the original quality was much higher; they've suffered somewhat because of GIF's 8-bit color.
|
Eight views, suitable for sprites |
Up-close promotional mug-shot |
Another perk of generating your sprites from a 3D model is that you can use the same model for other views -- like the promotional close-up shown on the right.
Transparency
POV-Ray can generate proper transparent sprites, too. Just omit the background object (plane, sky, etc.) from your POV-Ray scene file, and then choose an output format that supports an alpha channel (and check the "Add Alpha Channel" box in the output settings panel).Alternatively, you could just set the background color in your scene file to something unlikely (by using the "background" command under Templates > Statements). Then, your blitter can recognize this as the transparent color.
I didn't use this technique in my example because I wanted to demonstrate shadows. To get 2.5D sprites which work transparently over a background but also have shadows is beyond the scope of this document, but if you're interested, let's talk about it!
I hope this essay helps you begin making your own 3D rendered sprites. If you have any difficulties, write to me or the Meshwork Discussion List.
http://codenautics.com/meshwork/sprites.html
Last Updated: 5/05/00 . . . . . . webmaster@strout.net